Hi, Just have a first try of cats and dogs project, the loading of the dataset does took me some time. In this experiment, I’m using a 3-convolution layered CNN The configurations are as follows:
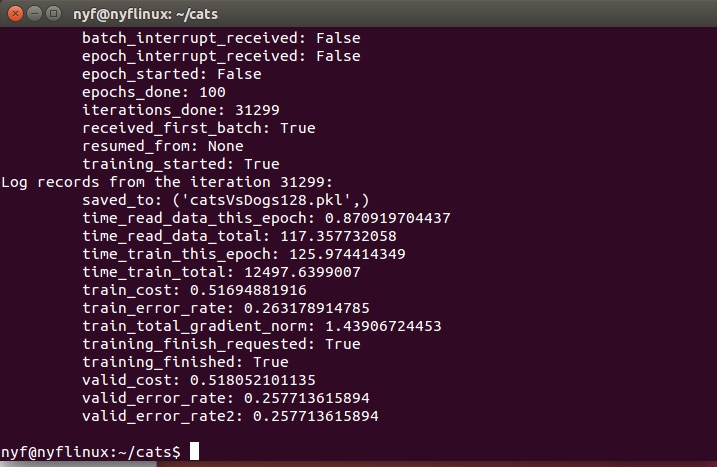
The result is after 100 epochs is that training error=26.31%, validation error= 25.77%
I still have some difficulty to plot the learning curves because of the Bokeh live plot problem, it always prompts me that it cannot import curstate module….
I tried to unpackage the pickled log file but pickle also throws error: AttributeError : Unpickler instance has no attibute ‘persistent_load’. I’m trying to fix it and for the moment I have to post just a snapshot of the console snapshot.
The learning is kind of slow, the training loss and training error decreases very slowly, I don’t know why, because the prof said using SDG will bring the loss/training error rate quickly down at first several epochs…
Hello, Here is a memo to show how to install the theano deep learning package on the Hades remote machine or on local machine.
It’s very easy to use git to “clone” a copy of installation files onto the remote machine or on your own local machine.
But if you don’t have git installed on the remote machine or local machine, please first do:
$ sudo apt-get install git-all
If you already have git installed you can do the following to clone a copy of the theano package to your machine:
$ git clone https://github.com/Theano/Theano
This will download the theano package into your home directory
Then you can just install it by typing the commands: Be careful, if your numpy,…ect are installed with anaconda python, you should make sure that your python command (interpreter) here is anaconda’s, and the anaconda should be installed with your user prililege not root. You can veryfy by typing from home:
$ ls -lr
to see if the anaconda direcory’s owner is you.
Then cd to the Theano directory to install:
$ cd ~/Theano
$ python setip.py develop
The installation should be fast and straightforward.
Then you should configure the Theano to make use of your GPU
Hello, Here is a memo to show how to install anaconda (integreted package of numpy, scipy, matplotlib,…etc…) on the Hades remote machine. As you know, anaconda is an integrated package containing a lot of useful packages such as numpy, matplotlib etc… so you don’t have to install them one by one. Another benefit is that we can easily install a version of MKL blas library, if installed seperately, that will cause a lot of time and may be imcompatible.
Because we are using the remote machine, we are only a normal user and don’t have sudo prililege. So there are several ways to install it to our user’s directory.
One easist way is to download the compiled anaconda installer for linux anaconda-2.5.0-x86_64.sh from the anaconda’s repo. And then upload it to the remote machine’s storage, and then install it directly on the remote machine
You can choose a version that best suits your OS and your need (python2 or python3), download it to your local machine and then upload it to the remote machine.
Another easier way is to download it directly from your remote machine:
1.first log on to the remote machine by ssh by typing:
$ ssh username@hades.calculquebec.ca
$ #type your password
using wget command to download the anaconda package directly from your remote machine
This command will download the installer file from the repo direcly to your remote machine.
install the anaconda on the remote machine by executing it:
$ bash Anaconda2-2.5.0-Linux-x86_64.sh
And then just follow the text instructions, always type yes or y to agreee with the license agreements…Then it will install, you can see the installation progress.
update the environment variable and make that take effect immediately
$ source .bashrc
5.And when this anaconda is installed , you’d better to install intel’s MKL Blas library, this will help better linear algebra calculations.
$ conda install mkl
Finally you can check if the MKL Blas library is correctly installed
$ python
1
2
import nunmpy as np
np.__config__.show()
If there’s something MKL in the BLAS info, you are done.
Trouble shooting: Sometimes, with olders anaconda versions (such as 2.4.1), the MKL will give warning saying the license will expire in xxx days, actually it’s already free now. You can repair by either install anaconda 2.5.0 (newer anaconda has already fixed it) or fix older installed version by:
set your installation to use the mkl-linked libraries that do not require a license
$conda remove mkl-rt
$conda install -f mkl

run conda install with the specific packages you choose or with all of Anaconda:
$conda install numpy scipy scikit-learn numexpr

or update the whole anaconda to 2.5 or newer
$conda install anaconda=2.5
How to write a lot of math formulas in your blog with markdown language? This is a simple solution: using MathJax Library It’s a open source javascript library, which doesn’t transform a formula into image, but using javascript to print that formula on the webpage. You can either download the js library which cost about 130M space, you can also use their CDN, so you won’t need upload the library on your web space.
For Hexo user, just append the following code in your themes/jacman/layout/_partial/after_footer.ejs file
Hi there, This is a tech memo to show how to build your own blog using a website generating tool called Hexo. You only have to configure the config file and the tool will automatically generate the html, css files for you. Then, you can upload your website to the Internet.
Thoses 3 pieces of software provide both multi platform support such as linux, windows, mac… Installation of the Node.js and Git software should be straight forward, since they provide a GUI installer.
Then you should install Hexo tool (the web generating tool) through the git command line. In mac or linux it is integrated into your terminal (Shell), and in windows it will install a Git Bash and you should click open that terminal.
When you have opened a terminal, you can just type the following command to install npm through git: